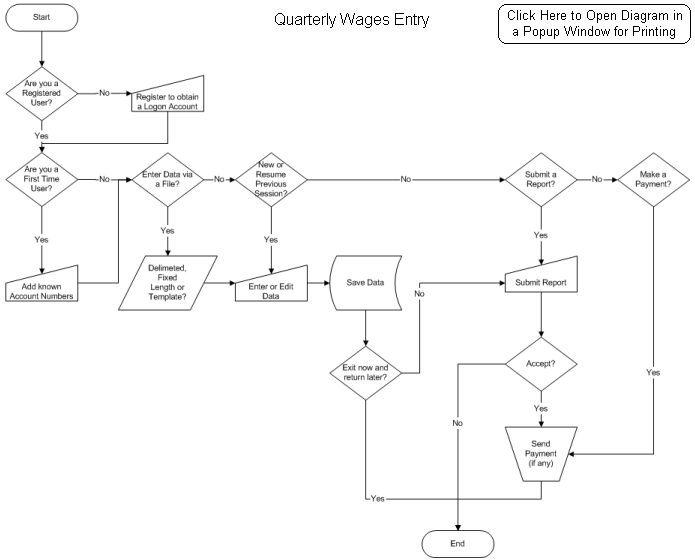
Click on items in the diagram below or scroll down to read the entire text. |
||||||||||||||||
|
||||||||||||||||
|
|
General Information | |||||||||||||||
|
|
If you have registered with the Unemployment Tax Administration Division and have an active account number,
you may file your unemployment taxes using the Internet Wage Reporting System (IWRS). You can report your wages
and submit them on-line using our secure website. You may also submit your payment using Electronic Funds Transfer
(EFT) or send your payment using a personal check.
Once you have finished filing your report, you must verify that the information is correct by selecting the Confirm button. You will then receive a Confirmation Number which is your proof that the report has been received at the South Dakota Department of Labor. Your report will not be considered as filed unless you receive a confirmation number. Be sure to print a copy of the report and the Confirmation Page for your records. You may need this information at a later date. | |||||||||||||||
|
|
Adding Accounts to your Profile | |||||||||||||||
|
|
Once you have Registered, your profile can be associated with your accounts. Please
login to the application for the first time and add your existing accounts and pin
numbers to your profile via the frame that is opened by default. Once you have completed
this, you may use the application to file your reports on line.
Should you wish to add or remove accounts from your profile, please contact the Department by phone at 605-626-2312 and be prepared to provide your Username and to answer a validation question to identify yourself to the operator. |
|||||||||||||||
|
|
Help | |||||||||||||||
|
|
The Help section contains detailed instructions to assist you in completing
your online report. You can access Help without exiting the application. Many
items throughout the application also have instant help in the form of a hover text.
You can access this by placing your cursor on a specific item. If help is available
for that item it will appear here. As always, please feel free to contact the
Department by phone at 605-626-2312 if you have any questions |
|||||||||||||||
|
|
Printing | |||||||||||||||
|
|
You may print a copy of your completed report once you reach the Confirmation Page.
Click on the PRINT icon to print a copy of the calculated totals. Then click on
the DRILL down icon to view the individual employee wages. Click on the PRINT
icon again to print this information.
Reports previously filed online using this application can also be viewed and printed. Use the PRINT icon located within the program to print reports.  |
|||||||||||||||
|
|
Saving Your Information | |||||||||||||||
|
|
The program will prompt you to save your payroll information after you move from
the employee detail screen. You will be prompted to select the drive and path in
which you want your file saved. The saved file can be accessed from the HOME screen
under COMPLETE A SAVED REPORT or SUBMIT A SAVED REPORT.
 |
|||||||||||||||
|
|
Exit | |||||||||||||||
|
|
To leave the system, press the EXIT icon in the lower left hand corner of the page
(red button marked with an X). Remember, if you have not received a Confirmation Number,
your report has not been filed. You must complete the filing process prior to exiting
the Internet Wage Reporting System. If you have completed the filing process, your
report will be displayed as pending until the department imports the confirmed report
at the end of the day. If you must make a correction to a report that has been confirmed
but not yet processed, you must first delete the report by clicking on the CANCEL icon;
then select EDIT SAVED REPORT NOW from the HOME menu and select the report you saved
to edit the wage list for employees. |
|||||||||||||||
|
|
Filing Periods | |||||||||||||||
|
|
Filing for the current quarter begins 10 days prior to the end of the quarter.
See the chart below for the filing periods.
Reports and payments not received by the due date are subject to penalty and interest charges as required by state law. | |||||||||||||||
|
|
File Quarterly Report |
|
|
Use this portion of the Internet Unemployment report to file your quarterly report. You have three options to enter your wage data. You can upload your wage information from your payroll file directly into the Internet Unemployment Report. You may choose to enter the wages for employees you have previously reported to the department. Or you can enter the entire record for each employee. If this is the first time you are reporting to the department you can either upload a file in the program or enter the entire employee record manually.
|
|
|
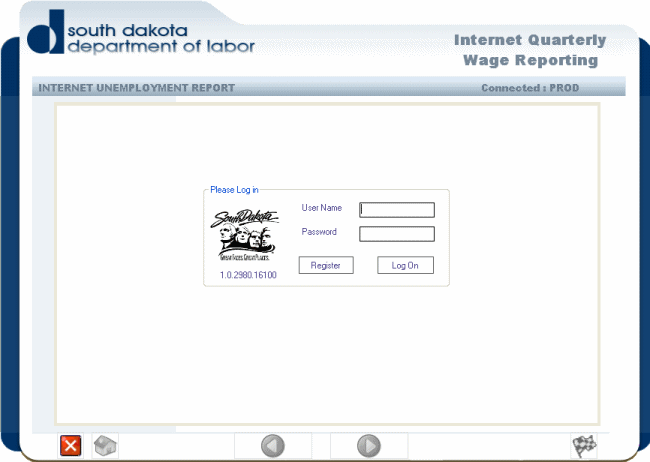
Login |
 |
|
|
|
You must have a valid login account to enter the system. If you have not yet registered and obtained a valid Username, please do so now by clicking the Register Button If you have a valid Username and Password, please enter it now and click the 'Log On' Button. Note: If you are logging onto the system for the first time and you have accounts and pin numbers, please add these accounts to your profile by following the instructions on the popup form. Once you are logged in, you may work with all accounts that are associated with your profile. To add or delete accounts from your profile, please contact the Department of Labor. |
|
|
Menu |
 |
|
|
|
The Menu Page of the Quarterly Wage Reporting System If you are returning from a previous session to complete the filing process, you would choose 'Complete a Saved Report' or 'Submit a Saved Report'. The first allows you to edit the data you have previously saved before proceeding to the submit step, whilst the latter will take you directly into the submission process. Note: If the report you are filing results in a payment being due, you can proceed directly to the payment step. If it is deemed that no money is owing on the submitted report, you may exit the application.
|
|
|
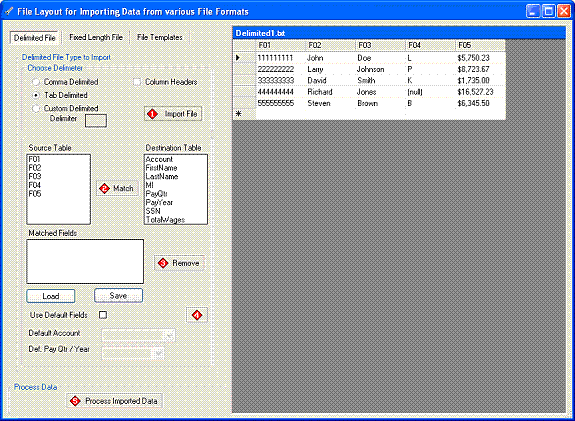
Upload a Delimited File |
 |
|
|
|
Note: The Internet Unemployment Report will save your file layout form one quarter to the next quarter. However, if you change your file layout, you must redefine your file to change the settings. |
|
|
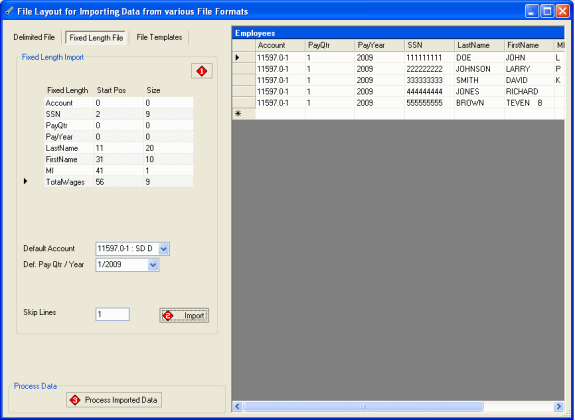
Upload a Fixed Length File |
 |
|
|
|
There are three steps to upload a fixed length file.
Note: The Internet Unemployment Report will automatically save your file layout from one quarter to the next quarter. However, if you change your file layout, you must redefine your file to change the settings. |
|
|
Upload a File using File Templates |
 |
|
|
|
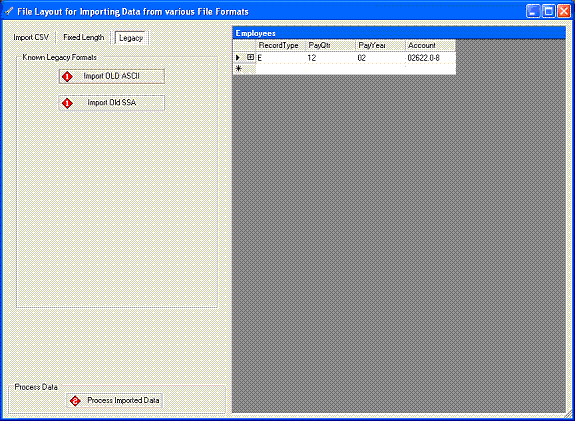
Legacy File Upload The department has created templates for files that are commonly used. Two templates that have been designed include the ASCII file. Users who use the payroll program from Software Unlimited Inc should use this layout. The second template available is for the ICESA Format. Layouts for these files have already been defined and you may select the type of file you use and upload your file in two easy steps. In the first step, select your file type. For example, if you use Software Unlimited Inc. select IMPORT ASCII tab. Select the drive and path where you have saved your file. Then click OPEN. Your file will be dropped into the online wage report. In Step 2, click the PROCESS IMPORTED DATA button to upload your file. When the upload is complete, you will be directed to the next step in the reporting process. |
|
|
Enter Wages for previously reported Employees Enter Entire Record for Each Employee Edit Saved Report Now |
 |
|
|
|
This screen contains your employee wage detail. You are able to enter wages individually on this report or view the wage detail from a file you uploaded directly from your payroll software.
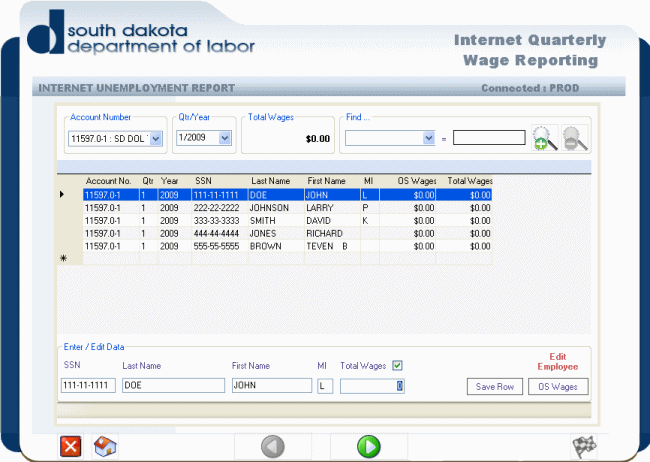
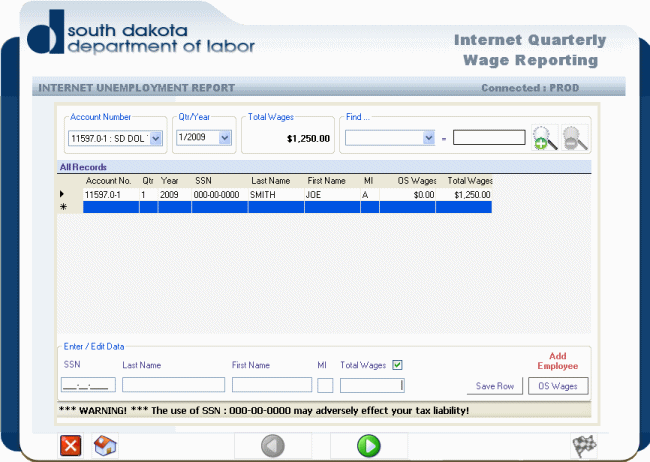
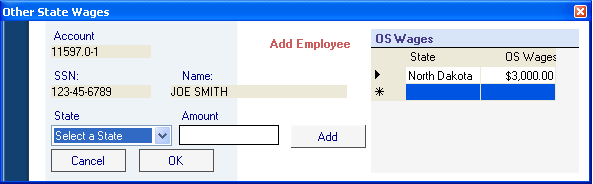
Enter Entire Record For Each Employee If you are filing quarterly reports for the first time, enter wages for each employee using this option from the HOME screen. Select your state account number from the drop down menu box near the upper left hand corner. Then click on the first blank line on the worksheet. In the ENTER/EDIT DATA field on the bottom of the screen, enter the last name, first name, middle initial if available, and the total wages. Hit ENTER or click on the SAVE ROW button and the entry will be added to the top line of the worksheet. Repeat for each employee. If you are filing a report for a previous quarter you will need to change the quarter and the year by selecting the appropriate filing period from the QTR/YEAR selection option on the top of the screen. The worksheet will maintain a running total of the gross wages on the top of the screen. If the Total Wages field does not match the totals from your payroll program, you have made an error in your entries. Check your amounts and make any necessary corrections. Excess wages will be calculated at a later time during the filing process. If you enter a duplicate social security number, you will receive an error message. You must correct the error before you will be allowed to proceed in the reporting process. The program will not allow you to enter a negative wage amount. You must make the correction in the quarter in which the amount was originally paid to the employee. To do this, select MANUALLY FILE FORM 21C from the HOME screen. If you have an employee that earned wages in another state and you need to add those wages to calculate excess wage amounts. Click on the line containing that employee. Then click on the OS WAGES (other state wages) button. A new window will appear. Select the state where the other wages were earned, enter the amount of wages earned in the other state. Then click the ADD button. This entry will appear in the grid to the right. Repeat if wages were earned in other states. Once you have completed, click the OK button. The wages earned in the other state/s will be transferred to the worksheet. If you need to delete an employee, highlight the line. Then right click on your mouse and select DELETE CURRENT RECORD. If you delete an employee in error, click on a blank line at the bottom of the list of employees and re-enter the employee information in the ENTER/EDIT DATA fields. You can sort information contained in the worksheet by clicking on the heading of an individual column. To sort by last name in descending order, click on the Last Name heading. Click again to sort in ascending order. To search the worksheet for specific information, select the information you wish to search for in the drop down box under Find. Then enter the specific item you are searching for in the data entry box and select the magnifying glass with the + sign. To return to the worksheet, select the magnifying glass with the � sign. Once you are finished, click the GREEN ARROW on the bottom of the page. You will be required to save your file before moving to the next step. Select the drive and path where you will save your file. Click the SAVE button. The file will be saved to your computer in the event you are interrupted and need to return at a later time to finish the filing process. You may also use this feature to retrieve the file for another filing period if there are no changes in the wages paid to employees from one quarter to the next. Enter Wages For Previously Reported Employees Use this option if you wish to retrieve the names and social security numbers of the employees reported in the last quarter. Select the account number from the drop down menu box. Employee information filed in the previous quarter will be pre-populated. This list may be sorted to match your employee printout by clicking on the heading of the column. For example, if you wish the list to be in alphabetical order by last name, click on the Last Name column. Click on the first line in the worksheet to highlight the first employee. The employee social security number and name will be inserted into the ENTER/EDIT DATA line on the bottom of the screen with the Total Wage field highlighted. Enter the total gross wage for each employee then hit ENTER or click SAVE ROW. The next employee in line will be loaded. Repeat until all entries are made. If you are filing a report for a previous quarter you will need to change the quarter and the year by selecting the appropriate filing period from the QTR/YEAR selection option on the top of the screen. The worksheet will maintain a running total of the gross wages on the top of the screen. If your TOTAL WAGES field does not match the totals from your payroll program, you have made an error in your entries. Excess wages will be calculated at a later time during the filing process. If you enter a duplicate social security number, you will receive an error message. You must correct the error before you will be allowed to proceed in the reporting process. If you have an employee that earned wages in another state and you need to add those wages to calculate excess wage amounts. Click on the line containing that employee. Then click on the OS WAGES (other state wages) button. A new window will appear. Select the state where the other wages were earned, enter the amount of wages earned in the other state. Then click the ADD button. This entry will appear in the grid to the right. Repeat if wages were earned in other states. Once you have completed, click the OK button. The wages earned in the other state/s will be transferred to the worksheet. If you need to delete an employee, highlight the line. Then right click on your mouse and select DELETE CURRENT RECORD. If you delete an employee in error, click on a blank line at the bottom of the list of employees and re-enter the employee information in the ENTER/EDIT DATA fields. You can sort information contained in the worksheet by clicking on the heading of an individual column. To sort by last name in descending order, click on the Last Name heading. Click again to sort in ascending order. To search the worksheet for specific information, select the information you wish to search for in the drop down box under Find. Then enter the specific item you are searching for in the data entry box and select the magnifying glass with the + sign. To return to the worksheet, select the magnifying glass with the � sign. Once you are finished, click the GREEN ARROW on the bottom of the page. You will be required to save your file before moving to the next step. Select the drive and path where you will save your file. Click the SAVE button. The file will be saved to your computer in the event you are interrupted and need to return at a later time to finish the filing process. You may also use this feature to retrieve the file for another filing period if there are no changes in the wages paid to employees from one quarter to the next. EXCESS WAGES. The internet wage report automatically calculates the excess wage amounts for each employee by comparing the amount of wages paid to the employee in the previous quarters during the calendar year. The amount of the excess wage per individual and the total excess wage for the quarter will be calculated and displayed on the voucher page. If the amount of the excess wage is incorrect, you have an error in either this quarter or previous quarter. Cancel the report at this point and back up to review the wages and social security numbers. The program does not allow you to edit the amount calculated for excess wages. Generally, if there is a discrepancy in the calculation of the excess wage amount it is due to an incorrect social security number used for an employee in the previous quarter/s. If you have an employee that earned wages in another state and you wish to use those wages to determine the correct excess wages, you need to add gross wages earned in the other state to calculate excess wage amounts. Click on the line containing that employee. Then click on the OS Wages (other state wages) button. A new window will appear. Select the state where the other wages were earned, enter the amount of wages earned in the other state. Then click the ADD button. This entry will appear in the grid to the right. Repeat if wages were earned in other states as well. Once you have completed, click the OK button. The wages earned in the other state/s will be transferred to the worksheet. |
|
|
Entering an Invalid SSN |
 |
|
|
|
The following WARNING message will be displayed if an invalid SSN is detected. *** WARNING *** The use of SSN : XXX-XX-XXXX may adversely effect your tax liability! Where XXX-XX-XXXX is the offending SSN This is a warning only and will not prevent you from uploading your report. However, because of this SSN, we can not accurately calculate the excess wages for your employee. This may therefore have an adverse impact on your tax liability. It is thus recommended that you ALWAYS enter the correct SSN for an employee. |
|
|
Enter Out-of-State Wages |
 |
|
|
|
Perform the following steps to enter Out-of-State Wages for an Employee. (Note
the form is in Insert Mode)
To Edit Out-of-State Wages previously entered, perform the following steps; (Note the form will change to Update Mode)
|
|
|
Submit Report Now |
 |
|
|
|
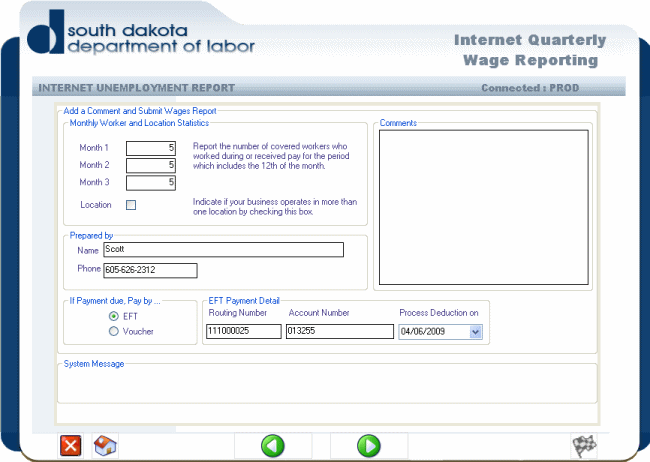
Sign the Report
Once you have completed entering the employee�s wages, you will be required to furnish additional information and sign your report. First, for each month during the quarter enter the number of full-time and part-time workers who worked during or received pay (subject to Unemployment Insurance wages) for the payroll period that includes the 12th of the month. If your business operates in more than one location in South Dakota, place a check in the box. The preparer of this report must furnish their name and telephone number in the event there is a question concerning this report. You may also include any questions or comments regarding this report or your business in the comments section. If money is due with your report, you may choose to make your payment by Electronic Funds Transfer or by sending a check along with a voucher. Indicate your desired method of payment by clicking next to the selection. If you select to pay using EFT, enter your bank routing and your account number. This banking information associated with the account number will be saved from one quarter to the next. Then select the banking day you wish your payment to be deducted from your account. You may not select a date outside the month the payment is due unless your report is delinquent. If your report is delinquent, you will be allowed to select only one of the next five available banking days to submit your report. Once you have completed the information on this screen, press the GREEN ARROW pointing to the right. The progress of the upload and report processing will be displayed in the system message area on the bottom of this screen. *Note: if you are having problems advancing from this screen, check for an error message in the box in the lower left hand corner for "System Messages". This will list items that must be addressed before moving to the next portion of the report. |
|
|
View Submitted Report |
 |
|
|
|
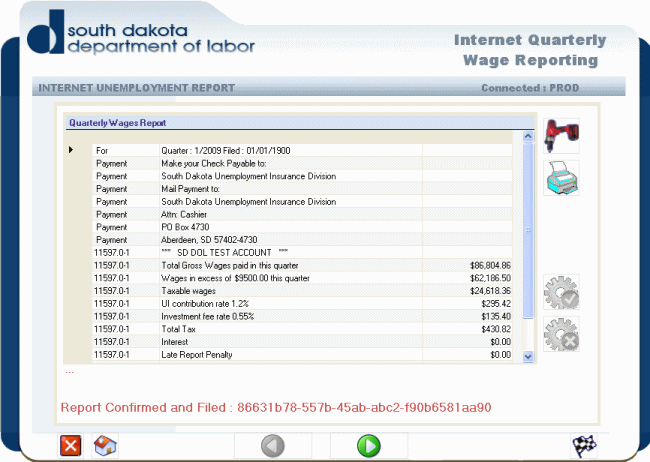
Help on Totals Page
Information summarizing the report you have prepared is shown on this page. You will find the calculated totals for gross, excess, and taxable wages. In addition, the amount of tax you owe is listed along with information on where to send your payment. If you chose to make your payment by EFT, this method of payment will be indicated near the top of this page. Here you can view the calculated totals for each employee. To view these totals, select the DRILL icon pointing down. Review the individual totals to insure the excess wages are reported correctly. If there is an error in this calculation, do not confirm the report. Instead, cancel the report and go back and make the appropriate corrections. You must confirm that the information on your report is correct and that you now wish to file the report. To do so, click the CONFIRM icon. You will receive a Confirmation Number indicating the report will be filed with the information you have provided. Reports that have been confirmed will be tagged as pending on the day that they were prepared. The Department will export all confirmed reports before the next business day and then they will be label with the PROCESSED DATE. If the totals listed on this page are incorrect, click on the CANCEL icon. You will be redirected to the previous screen to re-enter or upload employee wage information. Remember, if you do not confirm the report, it will not be filed with the department. Once you confirm the report you will be prompted to print a copy for your records. A popup window will appear showing the total payroll information as well as the amount due. Print the report using the print manager. To print the individual employee information, click on the DRILL DOWN icon to show the employees then click on the print icon to initiate the print process. |
|
|
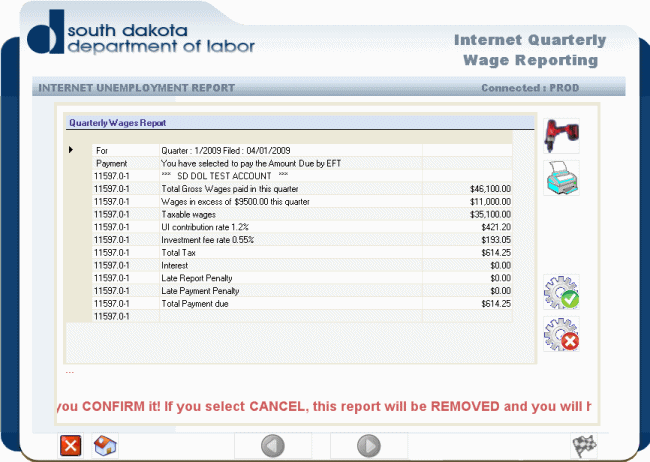
Confirm or Cancel Submitted Report |
 |
|
|
|
If the Report is Confirmed, a confirmation number is displayed (see above).
If the Report is Cancelled, 'Report Cancelled' will be displayed. Note: Both the Confirm and Cancel Buttons are disabled after a selection is made. If the Report is 'Confirmed' and a payment is required, the 'Next' arrow if enabled. If no payment is required, you may only exit or return to the menu page. If the report is cancelled, it will be removed from the DOL system. This means that you have not filed a report. You must now modify your previously entered data and Submit your revised Report. |
|
|
Pay Balance Due by EFT |
 |
|
|
|
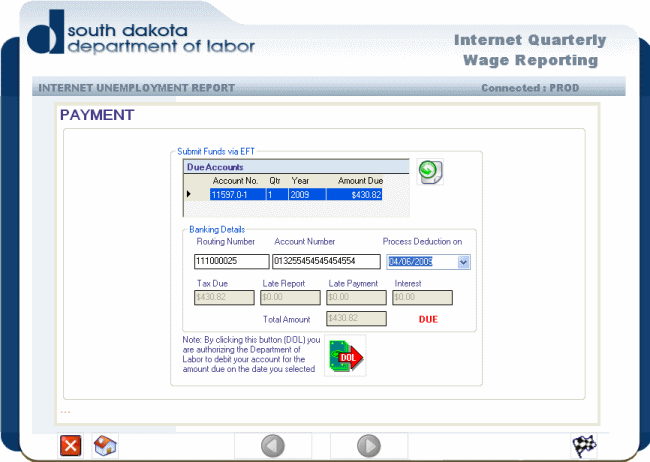
View and Pay
This portion of the Internet Wage report allows you to make your payment for the report/s you have filed online and to view reports that were previously filed. Pay Balance Due by EFT If you wish to pay your tax due using Electronic Funds Transfer (EFT) select the account by clicking the REFRESH icon to the right (next to Due Accounts). From the list, select the report for which this payment should be applied; if there is more than one quarter or account you are filing for this quarter, you must complete a separate transaction for each one. If you select to pay using EFT, enter your bank routing and your account number. This banking information associated with the account number will be saved from one quarter to the next . Then select the banking day you wish your payment to be deducted from your account. You may not select a date outside the month the payment is due unless your report is delinquent. If your report is delinquent, you will be allowed to select only one of the next five available banking days to submit your report. When you have entered all the required information and are ready to pay, click the DOL button. By clicking the button, you are authorizing the South Dakota Department of Labor to debit your account for the amount owed. |
|
|
Change Accounting Information |
 |
|
|
|
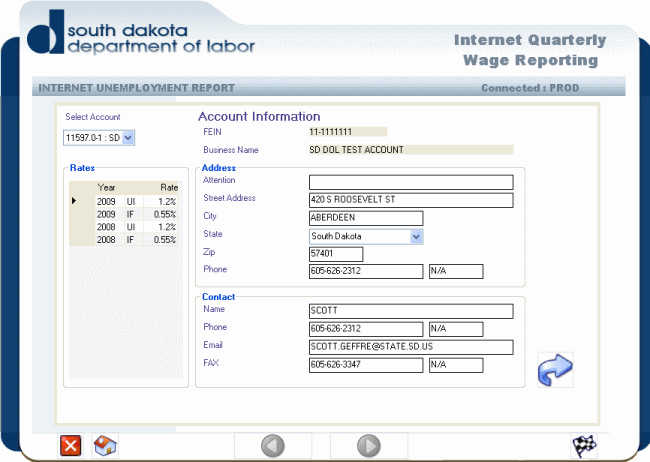
Change Business Account Information
You can inform the Department of any changes in your business within this portion of the report. In addition, you may make changes to information filed in a previous quarter by downloading Form 21, Statement to Correct Information Previously Submitted. Change Account Information This page contains information about your business as it was furnished to the Department. Select the account number affected by the change from the drop menu down box on the upper left side of the screen to view the information currently on file. Information includes the business name, Federal Identification Number (FEIN), mailing address, phone number, email address, and information about the contact person. It also illustrates the rates assigned to the account for the current and preceding calendar years. You may change any of the information contained within the entry boxes. Once you have made your changes, press the SAVE icon. The only information you will not be able to change on this screen is the business name, rates, and FEIN. It is important that you furnish the Department with an accurate email address. The Department will be electronically sending you a reminder when it is time to file your quarterly report. |
|
|
Report Change of Business Information |
 |
|
|
|
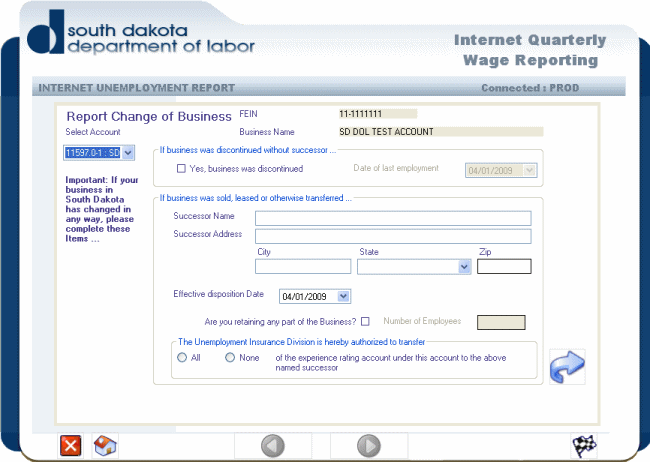
Report Change of Business
If you no longer have employment, your business has discontinued, or you have sold your business to a new owner, indicate that change here. Select your account number from the drop down menu box in the upper left side of the screen. If you have discontinued your business without a successor or no longer have employment, complete the first section by checking the Yes box and indicating the last date of employment. If you sold your business, complete the second section. Enter the name of the successor of your business and the address for the new owner. Select the effective disposition date. Indicate if you will be retaining any part of the business and how many employees you will continue to have. You must also inform the Department if you wish to transfer your experience rating account to the new owner of the business. Press the Save button to submit this information to the Department before exiting this screen. If you have any questions regarding the change in your business, contact a Tax Program Representative with the Department by calling 605.626.2312. Manually File Form 21C If you find an error in a report filed for a previous quarter, select this option. This is a link to transfer you to the Forms Page within the Department of Labor Website. Scroll down the page to the heading UI Tax Forms and other Documents. Find Form 21C, Statement to Correct Information Previously Submitted. This form can not be submitted online. However, you may fill in the form, print it, and mail to the Department at: PO Box 4730, Aberdeen, SD 57402-4730. |
|
|
View Prior Quarterly Reports |
 |
|
|
|
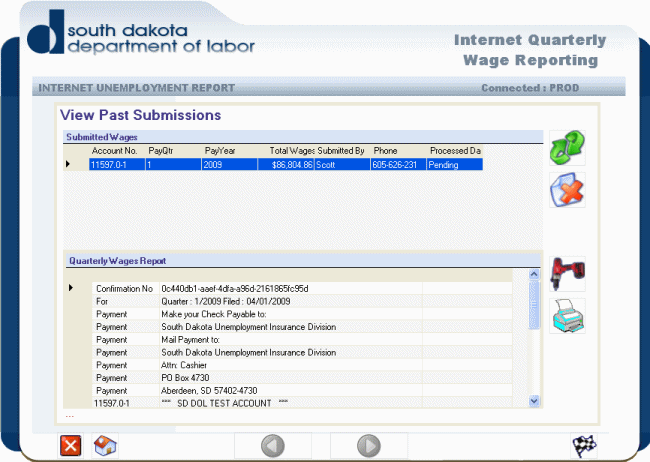
View Prior Quarterly Reports
If you wish to view reports filed for previous quarters, select this option. Click on the Button to show previous reports available for you to view. Click on the report you wish to view. You can view both the employee detail as well as the totals for the selected quarter by selecting the Drill button. If you would like to print a copy of the report, click on the Print button. Changes can not be made to previously filed reports online. If you need to correct information on a previous report, you need to complete Form 21C, Statement To Correct Information Previously Submitted. This option is available on the Top page under the Change Business Account Data & Manually File Form 21C. |